Thursday, June 09, 2005

Golf IV sound system installation

As the description of this page indicates, I wanted to install a sound system in my car. This is it! It is done and works like a charm. I just need to fine tune the cutoff frequency and gain of the sub then its all done.

Below is a somewhat incomplete description of what was done.

Specs:

Car: Golf 4 1.6 Comfortline ('99 model)
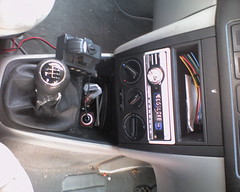
Radio: JVC KG-D511 4x50 W with RCA outputs for both front and rear. Shuttle input and remote control (extra)
Amp: Audiobank 2x300 W, build-in bridging and filters: LPF 10-250 HZ.
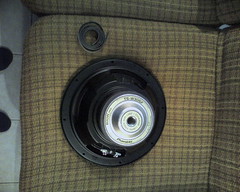
Speaker: Pioneer 800 W 12 inch.


Subwoofer box
Originally uploaded by pgreeff.
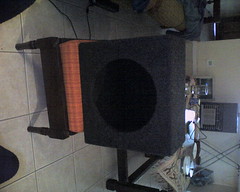
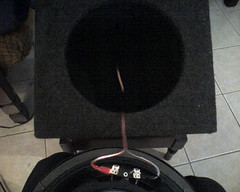
This is the box for my yet to be completed sub woofer.


Subwoofer box inside peek
Originally uploaded by pgreeff.
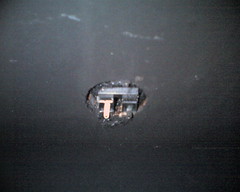
This is a pic of the inside of the sub. Note the connector where the wiring for the speaker will go.


Subwoofer box outside peek
Originally uploaded by pgreeff.
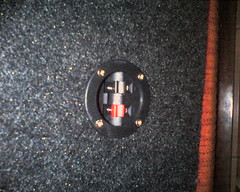
As with the 'Subwoofer box inside peek' this is the connector for the speaker wiring. It provides an easy method for connecting and disconnecting the enormous box to create extra space in the boot when needed.


Speaker for the sub
Originally uploaded by pgreeff.
This is the topside of the speaker to be used in the sub. It is a 12" 800 W (350 W nominal) pioneer. Note the tape on the upper left. This is used to seal the speaker to the box. Yes, this must be done.


Soldering iron
Originally uploaded by pgreeff.
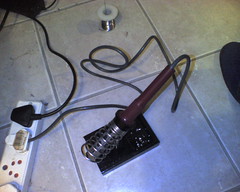
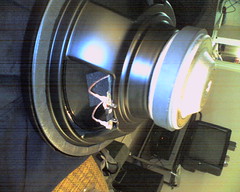
Yet another must. Solder the connections of the speaker to the connector. The wires wont stay there by spit alone.


Speaker
Originally uploaded by pgreeff.
Another view of the speaker. Note the connectors. These don't have to be soldered as the wiring kit supplied by audiobank comes with suitable connectors.


Sub speaker wiring
Originally uploaded by pgreeff.
We need some serious wires to drive the sub. 12 Gauge should do the trick.


Audiobank wiring kit
Originally uploaded by pgreeff.
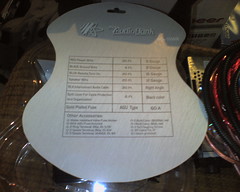
Audiobank supplies a very nice kit with all the wires and connectors you may need. It also includes a 60 A fuse.


Subwoofer and speaker
Originally uploaded by pgreeff.
Nice and neat! Note the tape at the speaker edge. When the self tapping screws are pulled tight this should create a good seal and prevent vibration and rattling.


Rear door
Originally uploaded by pgreeff.
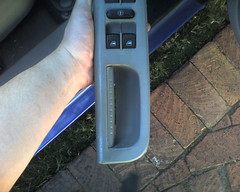
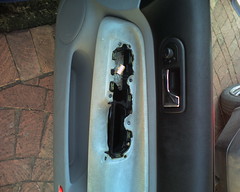
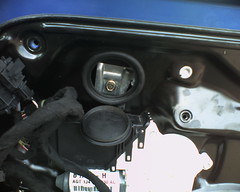
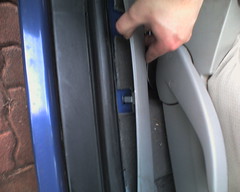
Golf 4 rear door with panel removed. Very easy indeed. Remove the small screws at the bottom of the panel - they require a special screwdriver (not the usual star) or a very willing swiss army knife. I used the latter. The door handle must be removed first as there are a number of big screw inside that must be removed. After that is done the panel just clips off.


Photo-0056
Originally uploaded by pgreeff.
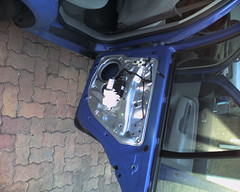
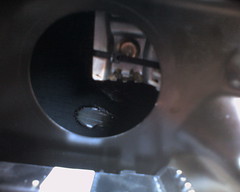
This is where the speaker goes. My 99 model golf 4 has wires for the rear speakers in front, but I couldn't find them anywhere.


Photo-0057
Originally uploaded by pgreeff.
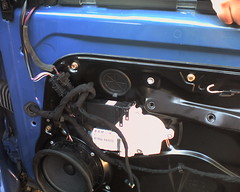
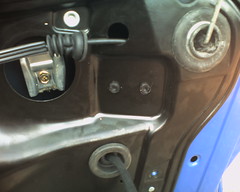
My 99 model golf 4 has wires for the rear speakers in front, but for the life of me I couldn't find them anywhere in the rear. So I used my own. This is the inside of the panel just above the seat belt mechanism. All the panels click into place. Use a screwdriver (gently now) to pop them off.


Right front panels
Originally uploaded by pgreeff.
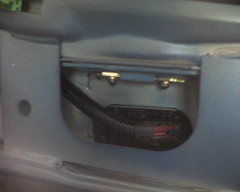
Pop this off with a screwdriver and feed the speaker wires through.


My radio
Originally uploaded by pgreeff.
Yes, not the most expensive, but the JVC KGD511 does the trick, very nice indeed. The VW Beta (and Gamma) radios need a special tool to remove it. Go to your nearest friendly VW dealer and surely he will help you.


Power for the amp?
Originally uploaded by pgreeff.
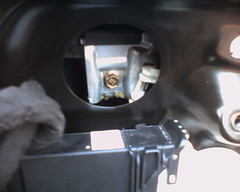
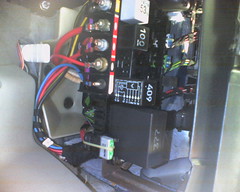
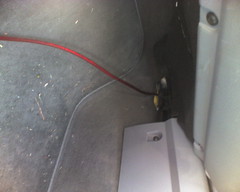
It took me the better part of the afternoon to find a spot where I can pull the 12 V power from the battery through the the interior. Where are all the hole that I had in my old Honda? No wonder the Golf is so quite. There isn't a spot for the sound to get through. Don't bother looking for one. Remove the panel on the driver side just above the pedals. You'll find 3 wires that come from the battery. The thick one (at the top) comes from my battery through a 100 A fuse and is then fused again through a 30 fuse. That leaves plenty of juice for the amp. Remember the fuse for the amp! We don't want anything critical dying on us.


Power for the amp?
Originally uploaded by pgreeff.
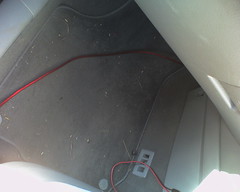
My audio cables and remote are routed on the right side of the car. This means the power must go to the left. Theres plenty of space under there.


Power for the amp?
Originally uploaded by pgreeff.
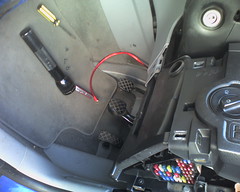
The power cable is later lifted and routed on to of a panel under the cubby and then the panel to the left.


Power for the amp
Originally uploaded by pgreeff.
The power comes through the center console. Plenty of holes for the wires.

Photos of the Golf IV windows repair

As promised, here they are. Read my original post for more detail.


Drivers side controls
Originally uploaded by pgreeff.
The driver side controls must be removed before the screws holding the door can be removed. The small piece of plastic inside the handle is easily removed by using a screwdriver or knife. The controls then easily clip off the door panel.


Driver side panel
Originally uploaded by pgreeff.
With the controls removed the three screws holding the door are easy to remove. There are also 3 small screw below the panel that must be removed. They're some kind of funny star screws. Buy the right screw driver or McGuyver it like me with you favourite swiss army knife.


Inside panel
Originally uploaded by pgreeff.
Once the panel is removed you're confronted with yet another panel. Don't fret. Leave it in place. Open the small rubber plugs (shown upper left) on both sides.


Window mechanism
Originally uploaded by pgreeff.
This is what the mechanism looks like (left plug) if the window is motored to the correct position. I was fortunate to have enough ramaining plastic to do some repairs.


Window mechanism
Originally uploaded by pgreeff.
Another view of the window mechanism. The metal is a small tab attached to the window. The plastic part is attached to a cable and moves up and down on the metal rail visible on the inside.


Window mechanism
Originally uploaded by pgreeff.
The tab on the left is the easiest to fix. I managed to cable tie the metal tab (3rd try) to the plastic mechanism.


Window mechanism
Originally uploaded by pgreeff.
Another view of the metal tab. After the cable tie is tight epoxy putty is used in ample quantities to fix the tab to the plastic. The epoxy putty binds to the metal, but not plastic. Use lots of putty. Make sure it does not restrict movement of the plastic clip on the rail. The electric motor is very powerful and will destroy the remained of the plastic clip if the putty gets in the way.


Window mechanism
Originally uploaded by pgreeff.
This is a shot of the mechanism on the right hand side. This one is considerably more tricky. Make sure there is enough putty in the right places. This tab is stressed the most and is in fact the point of failure for my previous 2 attempts.


Windows mechanism
Originally uploaded by pgreeff.
Put most of the putty on the inside as this will prevent the metal tab from jumping off the inside of the plastic clip.


Door
Originally uploaded by pgreeff.
My putty solution worked well, but I didn't like using putty to keep my car in one piece. I found a repair kit for the window (Golfwagen) for R 560 (about $ 90 give or take) and installed it in no time by removing the bolts surrounding the inside panel. Don't worry about the subber sealant. The panel is easily pried loose with a screwdriver. The rubber seals tightly once the bolts are reapplied.


Putty
Originally uploaded by pgreeff.
This is all the stuff I managed to remove from the door once I fixed the mechanism with the new plastic clips from the repair kit.


Some more putty
Originally uploaded by pgreeff.
Just below the putty is a metal bar used to keep the tension in the springs (you'll see what I mean) from pulling on the cables on the inside of the door. The two plastic tools are used to pull the cable over one of the pulleys. Once the panel is open it takes about 10 to 15 minutes to repair the mechanism.

Tuesday, June 07, 2005

QEMU

QEMU

Who needs VMWare if you have an opensource alternative. Includes an optional proprietary accelerator module to increase the speed of the emulation. Similar to the virtualisation process employed by VMWares system (which is an excellent product by the way) running programs almost natively on the host processor.

Friday, June 03, 2005

Kenwood KDC-922 radio in a VW GOLF by autotoys

Kenwood KDC-922 radio in a VW GOLF by autotoys

In my quest I found this page that help clear up some of my concerns. Autotoys have a great guide that shows step by step the process of installing a third party radio in the Golf IV.

Golf IV / Golf 4 trials and tribulations

I am the proud owner of a gorgeous Golf IV. She's my baby, and now, my baby is sick. As noted in the title of this page I want to document some of the more appropriate uses of my time. So, this is it, one of those times.

Most VW Golf 4 owners must've experienced this problem. If not, just wait. It's a question of when and not if it will happen (unless of course you've already had the upgrade).

Yes, I'm referring to the window dropping into the door frame. OK, so mine didn't drop into the door - it's more like it just doesn't move down into the door. Now as any person with half a brain, and maybe less, can see, there is not way that the small little plasic clips (2 clips) can hold the window while the stupendously powerful electric motor pushes the window upwards.

I decided to investigate. The replacement cost for the rails (well, the whole mechanism) is about R 2000 or about $ 300 at the current exchange rate. I think not. There goes my new sound system...

There must be a better way to resolve this. Removing the door panel reveals another panel covering the whole mechanism. It contains the motor, the mechanism and inside is the window. At first glance it doesn't look like there is access, but taking a closer look it is easy to note the 2 rubber plugs on each side end of the door. Once they're opened the rails are visible. It is quite difficult though to get to the rails and the plastic clips. With some effort it is possible to epoxy the plastic thingy (note the engineering terminology) on the rail on each site to a metal lip attached to the window. By epoxy I mean, and please note this, I mean a LOT of epoxy. From the photos that I will post a bit later only a little bit of epoxy putty is seen as most of it is behind the tab. This must be done to prevent the lip from jumping off the plastic support on the inside of the door. This will of course become much clearer the first time you hear that snap of the epoxy when winding up the window.

That pretty much solved it, for now. A friend of mine did the same on a Golf 3, but used normal putty. This has the tendence to loosen due to vibrations so epoxy putty is used as it binds to the metal. It doesn't glue itself to the plastic, so some effort must be put into correct placement of the putty.